Contents
CBSE Notes for Class 5 Computer in Action – Introduction to Scratch
Scratch is a software that lets you create interactive stories, animations, games, etc. It provides a graphical environment that lets you learn the basics of programming in an easy and fun manner. Scratch is freely le on the Internet. In this chapter, be using Scratch version 2.0.
STARTING SCRATCH
To start Scratch, you can follow the steps given here.
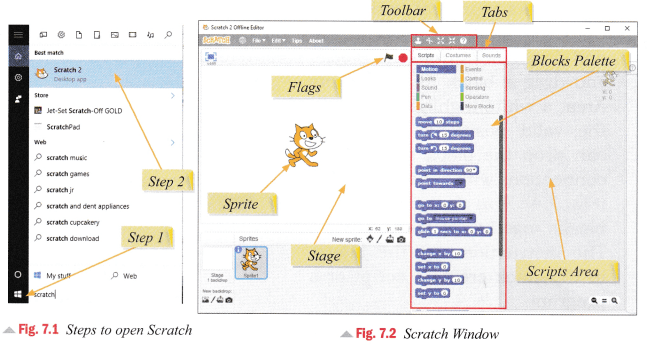
Step 1
Type Scratch in the Search Box next to the Start button.
Step 1
Click on Scratch 2 option.
The Scratch window opens up as shown in Figure 7.2.
Components of a Scratch Window
Let us get familiar with some important components of the Scratch window.
- Sprite: Scratch projects are made up of objects called Sprites that perform actions in the project. You give instructions like move, rotate and play music to a Sprite by using graphics blocks. Multiple blocks can be stacked or joined together to form a block stack. The stack of blocks which represent a set of instructions in a program introduces the student to the world of programming. In Figure 7.2, the object that is present in the centre of the stage is a Sprite. You can use the in-built Sprites or create your own Sprite.
- Blocks Palette: You give instructions like move, rotate and play music to a Sprite by making use of various blocks in the Blocks Palette. The blocks in the palette are divided into various categories such as Motion, Control and Looks (Fig. 7.3).

The blocks represent various commands that can be given to the Sprite. To program a Sprite, click on the required block category and drag blocks from the Blocks Palette to the Scripts Area. When you drag a block to the Scripts Area, a white highlight indicates the valid positions where you can drop the block and form a connection with another block (Fig. 7.4). You can join multiple blocks together to form a stack. The instructions on the blocks in the stack create a script or a program.

The instructions on all the blocks in the stack get executed when you click anywhere on the stack. The Sprite behaves according to the instructions in the blocks.
Some blocks have white editable text field inside them, such as the move block in the motion block category as shown alongside (Fig. 7.5). To change the value, click inside the white area and type in a number.

Some blocks have pull-down menus, such as the play drum block in the Sound block category as shown in Figure 7.6. Click on the arrow button to view all values and then click and choose the desired value. - Stage: Sprites move and interact with each other on the stage. It is where the Sprites perform.
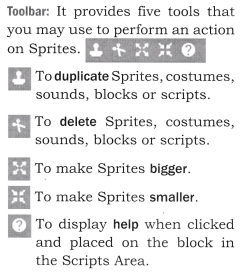
- Flags: Click on the green flag to start the project and on the red flag to end the project.
- Scripts Area: It is where all the blocks constituting instructions for Sprites are placed.
PROJECT
Creating a New Project
Step 1
Click on the File menu (Fig. 7.7).
Step 2
Choose the New option. A new project opens up.

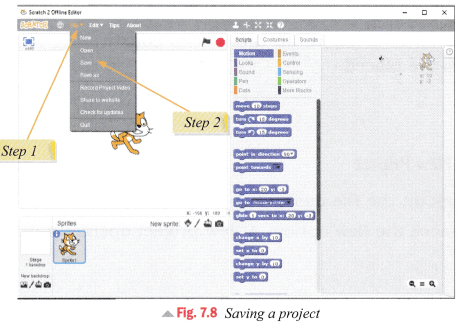
Saving a Project
Step 1
Click on the File menu (Fig. 7.8).
Step 2
Choose the Save option. The Save Project dialog box appears (Fig. 7.9).
Step 3
Select the folder in which you want to save the project.
Step 4
Specify the file name.
Step 5
Click on the Save button.

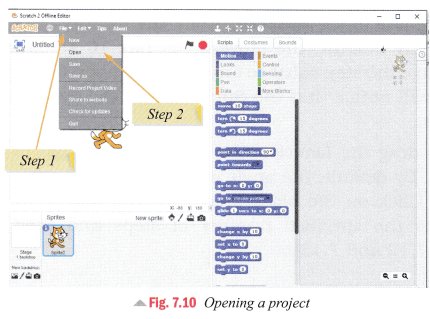
Opening a Project
Step 1
Click on the File menu (Fig. 7.10).
Step 2
Choose the Open option. The Open Project dialog box appears(Fig. 7.11).
Step 3
Select the folder in which the project is saved.
Step 4
Select the project name.
Step 5
Click on Open button.
The selected project opens in Scratch window.

PROGRAMMING SPRITE
You can program a Sprite to do various actions. Let us learn about these actions.
Moving the Sprite
You can move or turn the Sprite around through different angles by using the blocks in the Motion block category.
Step 1
Click on the Motion block category in the Blocks Palette.
Step 2
Drag move block ![]() from the Blocks Palette to the Script Area. By default, the move block has 10 steps as the value. Change the step value to any other number. Click on the block. You will notice that the Sprite moves the specified number of steps.
from the Blocks Palette to the Script Area. By default, the move block has 10 steps as the value. Change the step value to any other number. Click on the block. You will notice that the Sprite moves the specified number of steps.
Step 3
Now, drag the Turn clockwise block ![]() to the Scripts Area. By default, the angle of turning value is 15. Change it to 180. Click on the block stack. You will notice that the Sprite moves the specified number of steps and then turns itself(Fig. 7.12 and 7.13).
to the Scripts Area. By default, the angle of turning value is 15. Change it to 180. Click on the block stack. You will notice that the Sprite moves the specified number of steps and then turns itself(Fig. 7.12 and 7.13).


Adding Sound ‘
You can make the Sprite say words or play sounds by using various blocks in the Sound block category.
Step 1
Click on the Sound block category in the Blocks Palette.
Step 2
Drag the play drum block from the Blocks Palette to the Scripts Area. Change the drum type and the number of beats. Click on the block. You will notice that the Sprite plays the sound (Fig.7.14).

Repeating Steps
You can repeat actions of a stack of blocks by making use of various blocks in the Control block category.
Forever block ![]()
The forever block runs the blocks inside it over and over again. Follow the given steps:
Step 1
Click on Control block in the Blocks Palette.
Step 2
Drag the forever ![]() block from the Blocks Palette to the Script
block from the Blocks Palette to the Script
Step 3
Click on the Motion block in the Blocks Palette.
Step 4
Drag the move block ![]() from the Blocks Palette to the Script Area. Drop it inside the forever block.
from the Blocks Palette to the Script Area. Drop it inside the forever block.
Step 5
Drag the turn block ![]() fom the Blocks Palette to the Script Area. Drop it inside the forever block after the move block.
fom the Blocks Palette to the Script Area. Drop it inside the forever block after the move block.
Click on the block. You will notice that the Sprite repeats the movement and turning actions. To stop the script from running, click on the stop button on top of the stage (Fig. 7.15).

Repeat block
This block runs the blocks inside it a specified number of times. Consider the following block stack.
When this block stack is executed, the Sprite moves and then turns for only five times.
Wait block
This block makes the script wait for a specified number of seconds and then continue with the next block.Sometimes, it is important to use this block otherwise the movements occur so fast that they cannot be properly observed

When clicked block
Another very useful block is in the Events category. It is the block. When this block is on top of a stack of blocks, the actions of the blocks get executed when the green flag on top of the stage is clicked.
Let us try an example with wait block and when ph clicked block. Create the block stack as shown in the adjoining figure.
Click on the green flag on top of the stage to execute the given block. You will notice that the Sprite moves 40 steps, plays the sound and waits for 2 seconds and then moves back 40 steps.
Changing the look, colour and size of the Sprite
The blocks in the Looks block category let you change the appearance of the Sprite. Let us make use of some of these blocks.
Step 1
Click on the Looks block in the Blocks Palette (Fig. 7.15).
Step 2
Drag the think block from the Blocks Palette to the Script Area
Step 3
Drag the say block from the Blocks Palette to the Script Area.Change the words in the say block to ‘Let me change my colour’.
Step 4
Drag the set colour effect to block from the Blocks Palette tot he Script Area.Set the colour effect value to 10.
Click on the blocks to execute the script. You will notice that whenever you click on the up arrow key, the size of the Drag the say block the Script Area. Change the words in the say block to ‘Let me change my colour’.

Similarly, you can use and blocks to change the size of the Sprite.
The blocks and can be used to display or hide the Sprite on the stage.

Using tke Keyboard
You can also use the keys on the keyboard to program the Sprite.
Step 1
Drag the block from the Events block category to the Script Area. Click on the block and choose the up arrow key.
Step 2
Drag the block from the Looks block category to the Script Area.
Click on the blocks to execute the script. You will notice that whenever you click on the up arrow key, the size of the
Words to know
- Menu: A list of commands displayed on the screen.
- Sprites: Objects that perform actions in the Scratch project.
- Stage: It is the area where Sprites perform.