CBSE Notes for Class 9 Foundation of Information Technology – Microsoft Windows
Before studying about Windows, we need to understand what an operating system (OS) is. Computer is just a machine which does what it is told to do. In order to operate this machine, we need a set of commands provided to us through a software called operating system.
MICROSOFT WINDOWS
MS Windows is the most popular operating system for personal computers. It has been designed by Microsoft Corporation, USA hence, the name MS Windows. This operating system provides a very simple, easy but powerful interface to the user as it is extensively graphical (GUI—Graphical User Interface). Some of its main features are:
- Easy to understand and use. Most of the features are displayed in form of small pictures or buttons.
- The features can be executed by just a click of the mouse, so there is no need for learning a code or language for using it.
- We can work on more than one application simultaneously.
- The operating system is very fast.
- It has many built-in features and also supports various softwares which allow us to communicate with other computers, e.g., Netmeeting, Microsoft Outlook etc.
- The most important feature of Windows is Multimedia. Windows provide the best platform to make use of multimedia tools.
- Various versions of MS Windows are available e.g., Windows/95/98/Windows XP/NT, Windows 7 and latest being Windows 8 and Windows 10.
In this chapter we are using Windows 7 as the operating system.

MULTIMEDIA
It is the combination of sound, graphics, animation, text and video. A computer having the provision for these facilities is called a multimedia machine. MS Windows is the best platform to make use of the multimedia tools. Some of the multimedia facilities are:
- Player can be used to play CD-ROM.
- VLC media player can be used to view audio-video CDs and DVDs.
- Sound Recorder can be used to record sound using microphone.
- Volume Control is used to increase or decrease the volume of sound.
- Windows Media Player enables us to play multimedia files.

STARTING WINDOWS
As soon as we start Windows, a screen similar to the one shown in Fig. 6.3 appears on the VDU. This screen is called desktop. It has some small pictures displayed on it. These small pictures represent various applications and are called icons. At the extreme lower end of the screen is a horizontal bar called the task bar. It displays the start button and several other buttons which tell us which windows are currently open. If we minimize a window, its title will appear as a button on the task bar. Whenever we want to again open the window, we just have to click on its button. The task bar is not fixed at the bottom of the screen. It can be placed at any of the four sides of the screen using drag and drop method.

Tool Bar can be added to task bar as and when required. A shortcut of any application can be created on the tool bar by just dragging the application and dropping it on the tool bar. An icon of the application appears on the tool bar. Application can be activated directly from tool bar by just double clicking on the icon.

On the extreme right, the applications which continuously run in background are indicated, such as time, date etc. This area is called the notification area. There is an upward arrow head also which when clicked shows some hidden icons such as battery status, speaker volume, wifi signal status, various plug-ins etc (Fig. 6.4).
Keeping Track of Windows
All the open programs/files/folders are represented as a button with the corresponding icon on the task bar. If there are more than one windows open on the screen, only the latest open window’s button will be highlighted on the task bar.
For example, if a Word document is opened and then without closing it a Notepad document is opened then their buttons will Fig. 6.5: Task bar buttons appear as shown in Fig. 6.5.

When the mouse is moved over the buttons on the task bar, a small preview or picture of the corresponding window appears which is called the thumbnail. If there are several documents of the same type opened e.g., three documents of Word are opened then the button on the task bar appears like W.
START MENU
The start button when clicked opens the Start Menu shown in Fig. 6.6.
A few frequently used programs can be pinned to Start menu by
- Right clicking on the icon.
- From the pop-up menu click on Pin to Start Menu.
To view all the applications available on the computer:
- Click All Programs.
- A list of applications, or their folders will appear.
- Click on any application to open its directory.


Search Tab
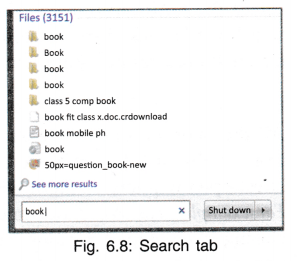
Below All Program is the Search Tab where you can type the name of application or file or folder to find out if it exists on your computer. If yes then where does it exist.
- Type the title to be searched (book).
- Press Enter.
- A list of all files/folders having ‘book’ as the name or a part of the name will be displayed.
- Click on your file to open it.
Folder on Start Menu
On the right side of start menu the following folders can be seen which are there by default on Windows 7 (Fig. 6.9).
- User: A personal folder for the user, where user’s files get stored.
- Documents: It contains the date- wise diary of all the programs or documents created by the user.
- Pictures: It is a folder where all the pictures downloaded or copied get stored by default.
- Music: All the audio files get stored in this folder by default.
- Games: It contains all the games provided for free with Windows 7.
- Computer: It displays all the drives, devices and removable storage devices attached to the computer.
- Control Panel: It is a facility given by Windows 7 using which you can change the settings like display, accessibility, security etc. for your computer.
- Devices and Printers: It is used to view which devices and printers are attached to the computer and how to manage them.
- Default Programs: It is used to set default programs for Internet surfing, e-mailing, playing music etc.
- Help and Support: If you need help on any topic or application click on this option and enter the topic on which you need help. The support text will be displayed. There is also an option for online help.

ACTIVE DESKTOP
The appearance of desktop screen can be changed by the following steps:
- Click on Start button.
- Click on Control Panel (Fig. 6.10).
- The Control Panel Window will appear in category view. You can change the view to Large icons or Small icons by clicking on View by option on the upper right corner of the window. Large icons and Small icons view display the list of all the items in Control Panel.
- Click on Appearance and Personalization option.
- Choose Change the theme to change the desktop background, window colour, sound and screensaver all at once.
- Click Apply to see the new settings.

FRAME
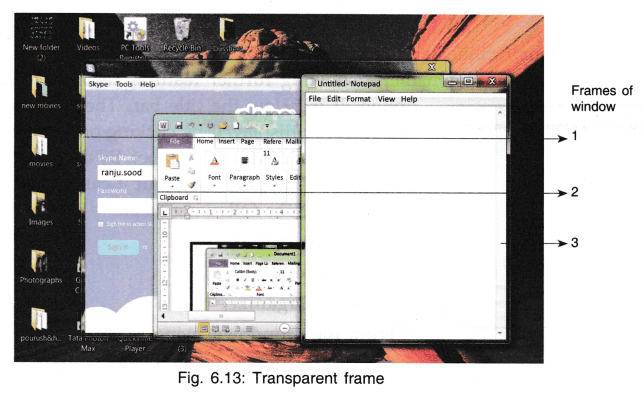
The outer boundary of the window is called its frame. The window can be moved, resized and dragged using the frame.
When the mouse pointer is placed on the frame border of window, it becomes a double-headed arrow.
Dragging the mouse in any of the arrow head direction enlarges or shrinks the window’s size. Since Windows 7 allows user to work on several windows together, you can open any window and work on them simultaneously. In the Fig. 6.13, three windows are opened on the desktop. By default the frame of windows in Windows 7 is glass transparent so that you can see what is behind the window frame.

A dialog box can’t be resized but it can be moved.
TITLE BAR
This is the topmost horizontal bar which shows the icon for the application, name of the application along with the file name of the opened document on the extreme left corner. On the right corner, there are three buttons — Minimize, Restore and Close [Fig. 6.14(a)].

- Minimize: This button reduces the size of the window and makes it appear as a button on the task bar. The window does not get closed.
- Restore: To bring the window back to its original size, we use this button.
- Close: This button closes the window.
The above options are also present in the system menu which can be displayed by clicking on the application icon as shown in Fig. 6.14(b).
In addition to Minimize, Restore and Close options, there are following three more options in System Bar:
- Move: This is used to move the window in the desired direction on the screen.
Choosing move makes a cross arrow() appear on the screen. The window moves as we move the cross arrow with the mouse. – - Size: Selecting this option helps us to resize our window vertically and horizontally with the arrows () and the arrow keys of keyboard.
- Maximize: To increase the size of window to full screen, click on this option.
MENU BAR
This bar shows various facilities and features available with the application. Clicking on any option displays a pull-down menu showing further features related to the chosen
option. It is below the title bar. The pull-down menu can be either displayed by clicking on the menu option or Alt+Underlined key alphabet. By default Windows 7 does not display Menu Bar but it can be activated and displayed by the following steps:
- Click Start button.
- Select Computers.
- Click on Organize.
- From the dropdown menu select Layout.
- Choose Menu Bar from the submenu.


SCROLL BARS
There are two Scroll bars — horizontal and vertical. These bars help us to view those areas of the document which are not visible on the screen due to the limited size of the screen. The Scroll bars have a Scroll box and two opposite faced arrows. Mouse/Keyboard can be used to move the Scroll Box.
STATUS BAR
It appears at the bottom of each window. It generally displays the number of objects being displayed by window and number of bytes consumed. Status bar has different types of information in different windows.
THE WORK AREA
The major area of the window is used as the work area where the user actually works.
USING A MOUSE
Mouse is an input device of the size of our palm. It can be moved in any direction on a flat surface — generally a mouse pad. Mouse has two or three buttons of which left and right buttons are mainly used. It has following features: –
- When we move mouse on the mouse pad, an arrow-shaped pointer moves on the screen in accordance with the movement of the mouse.
- Pressing the button and releasing it quickly is generally called clicking the mouse. Clicking the left button after placing the pointer on an object on the screen selects the object.
- Clicking the right button after placing the pointer on the object displays the Shortcut menu.
- Double clicking the left button on any application or file opens it.
- Mouse can be used to select a paragraph from a document by clicking and dragging it to the end of paragraph without releasing the button. Mouse is said to be dropped when the button is released.
By default the mouse settings are for right¬handed users. If you are a left-handed user you can change the mouse settings as follows:
- Click on Start button.
- Select Control Panel.
- Click View Large Icons.
- Select Mouse.
- From the Mouse Properties dialog box, select Buttons.
- Click Left-handed.
- Click Apply.
Speed of the mouse can also be adjusted from Buttons option. The shape of the mouse pointer can be changed by clicking on pointers option and choosing the required option

CREATING A SHORTCUT
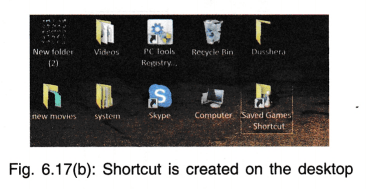
Suppose you use a file very frequently and everytime you have to open various folders and subfolders to reach the file to open it. By creating a shortcut of that file on the desktop and by clicking it, you can directly reach the file or application. To create a shortcut:
- Right click on the file name or application name or icon.
- From the menu, select Send To.
- Click on Desktop (create shortcut).
- You will see a shortcut icon created on the Desktop.

BASIC TOOLS
The Accessories folder in MS Windows 7 has many tools such as Calculator, Paint, Notepad, Snipping Tools, Sticky Notes, Windows Explorer to name a few (Fig. 6.18). In the next few topics, we will discuss some of the very useful and frequently used tools. To reach these tools:
- Click Start button.
- Select All Programs [Fig. 6.19(a)].
- Click Accessories [Fig. 6.19(b)].


Calculator
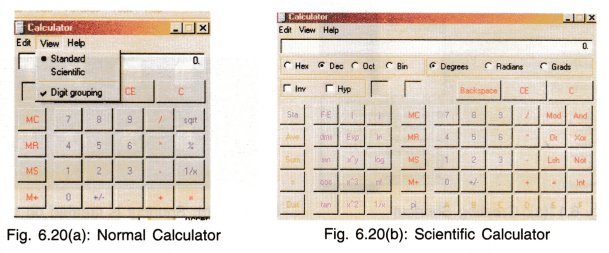
Windows provides both normal and scientific calculator which can be used as any simple calculator using mouse or keyboard.
Paint
This is a very useful tool for drawing pictures. These pictures can be viewed, edited and pasted in other documents also such as in MS Word document. To start working in Paint:
Click Start button —> All Programs —> Accessories —> Paint
The paint screen will appear as shown in Fig. 6.21 and has the following features:
- Title Bar: Shows the name of the document.
- Menu Bar: Has various options for paint.
- Tool Bar: Has various tools for drawing, painting, colouring, editing.

- Drawing Area: The blank area on which you can draw.
- Colour Box: Shows a variety of colours you can choose from.
- Status Bar: Gives vital information about the image, e.g., size. The various tools on the tool bar are shown in the Fig. 6.22 below:

To start working in Paint, first of all we have to open a file using File menu or from Quick Launch Menu [Fig. 6.23(a)]. For this,
- Click New.
A new window with drawing area will be displayed as shown in Fig. 6.21. You can draw any figure and colour it using the tools shown in Fig. 6.22.
After you have worked on the file, saving the file is essential as it will store your file in memory. From file menu,
- Click on Save as. A window as shown in Fig. 6.23(b) will appear.
- Choose the required location and type a file name. Click Save. File will be saved with the typed name and extension .bmp or .png.

Opening a File
- From File menu click on Open.
- In the window choose the location and type the file name.
- Click Open and you will get the required file.

Working with Different Tools
1. Brushes: Click on Brushes option and a menu with brushes of different thickness will appear. Choose the required brush for drawing. You can choose a colour for you brush from the colour palatte.

2. Drawing Shapes and Filling Colours: From the Home menu you can choose any shape from shapes group by clicking on it. The same shape gets drawn in the work area when mouse is dragged there. Size of the figure can be changed by the handles that appear around the picture. The transparent squares are for resizing the shape. Click on anyone square and drag it. The shape will enlarge in the dragged direction.

Colour can be filled in the shape by the following steps:
- Select the shape.
- Choose a colour from palatte.
- Click on Fill color.
- Bring the cursor to the interior of the shape and click.
- The shape will be filled with the chosen colour.

3. Eraser: Its function is same as of the normal pencil eraser.
- Click on Eraser.
- Drag the eraser over the portion to be removed.

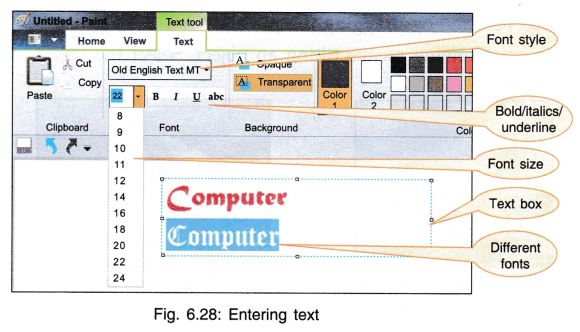
4. Entering Text: If instead of drawing you want to enter text, click on A. The cursor shape will change. Drag the cursor in work area so that a rectangle is formed. This rectangle is the text box. Click inside the box and you can start typing your text. Size of the box can be increased or decreased by box handles. Formatting of text can be done using formatting tool bar.
5. Select Tool: Any portion of the figure or the whole of it can be selected using Selection Tool.
- Click on Selection Tool.
- Drag and drop the mouse on the area to be selected.

5. Cut/Copy/Paste: Selected portion can be cut or copied and pasted at some other location. In Fig. 6.29 the cut portion has been pasted outside the figure.

7. Resizing an Object: On the Home menu under Image group, there is copy/paste tools an option to Resize which means increasing or decreasing the size of the selected object. The object can be either stretched horizontally or vertically.


Resizing can also be done by dragging the picture handles.
8. Skewing an Object: Skewing means tilting an object. Select the object and then enter the degree of skew.
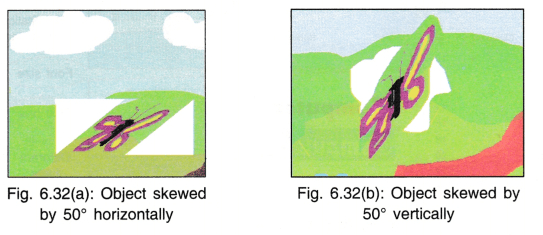
9.Rotating an Object: A selected object can be rotated right 90°/left 90°/180°. It can also be flipped vertically or horizontally. In Fig. 6.33(a) and (b) the trees have been flipped horizontally. Flipping means getting the mirror image of an object.

10. Printing in Paint: Once you have drawn the picture, to print:
Click File —> Print
Notepad
It is a text editor used for small files which do not require much formatting. It is used to view/create files with extension .txt. To start work on Notepad
Click Start —> All Programs —> Accessories —> Notepad
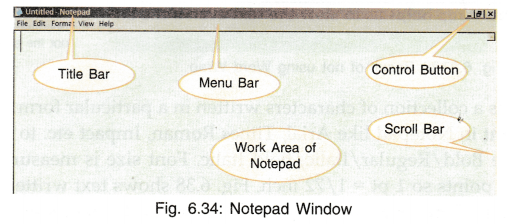
The File menu of Notepad has the following options:

The Edit menu of Notepad has the following options:

The Format menu has two options —Word wrap and Font.
- Word Wrap: When the width of the document is more than that of the screen, we cannot see the full text on screen. For this, we use word wrap facility which adjusts the width of each line of text according to the width of the screen. But this adjustment is done only for screen display and it does not affect the printing of the text.

- Font: Font is a collection of characters written in a particular form. There are various fonts present in Notepad like Arial, Times Roman, Impact etc. to choose from. Font style can be Bold/Regular/Italic/Bold Italic. Font size is measured in points. One inch has 72 points so 1 pt = 1/72 inch. Fig. 6.38 shows text written in various fonts, size and style. Font size can be adjusted according to the requirement.

Click on font and you will get a dialog box as shown in Fig. 6.39. Choose your font, style and size and see the result in the sample box.

The View option of menu bar helps to choose the bars to be displayed on the screen.
The Help option provides the user required help relating to Notepad.
ARRANGING ICONS
The position of icons on the desktop can be changed either with the help of mouse or by a pull-down menu.
1. Using Mouse
- Click on an icon and using drag and drop method, the icon can be placed anywhere on the screen.
2. Using Menu
- Right click on mouse anywhere on the screen and a menu will appear.
- Click on Sort by to get another menu displaying options for arrangement, e.g., arrange icons by Name/Data/Size etc.
- Clicking on Name will arrange icons on desktop in alphabetical order, Size will arrange them according to memory consumed and Date will arrange them according to the date of their creation on the computer.

DIFFERENT TYPES OF MENUS AND MENU SELECTION
Menus are the controls that open with a mouse or keyboard. They help in changing the settings, selecting commands and working with windows.
As we have menus in restaurants under various heads and then their submenu e.g.,

When you want Indian food, you choose Indian menu and then its submenus. If you choose Snacks then again there are several options for snacks. Similarly, in Windows, there are hundreds of menus with hundreds of commands which are hidden under the menus. The different types of menus are:
- For any application, just under the title bar, there is a horizontal bar called the menu bar (Fig. 6.41). It contains title for various menus. Click on any title and a list of command that fall under that title will appear. This is called a dropdown menu (Fig. 6.42).
- Some options in the menu are shown as grey which means they are unavailable and cannot be clicked.
- Some menus again have submenus and commands.
- Sometimes, when on a particular position in your application, if you right click the mouse a menu appears. This is a shortcut menu (Fig. 6.43).
- Sometimes the commands are displayed as a horizontal bar with their icons. This type of menu is called a ribbon (Fig. 6.44).
- If an option in menu bar has an arrowhead with it, that means a submenu is there. If the option has … (three dots) in front of it, that means, the option will lead you to a dialog box for further specifications.
- Sometimes shortcuts are also mentioned along with the command which can be run from keyboard e.g., New—Ctrl N

RUNNING AN APPLICATION
An application can be run or executed by any of the following methods:
- Double clicking its icon.
Or - Right click on the icon and from the menu select Open.
Or - Start —> All Programs —> Accessories —> Run.
Then type the application to open in the Open box and click OK. If you do not know the location of the application you can browse the computer using Browse button.

SETTING DATE AND TIME
Look at the extreme right bottom corner of the desktop.
Time and Date are displayed there (Fig. 6.46). If you want to change date/time,

- Click on Change date and time settings and a window as shown in Fig. 6.47(a) will appear.
- Click on Change date and time button. Another window [Fig. 6.47(b)] showing the calendar of current month and time will appear.
- Choose the new date and time and click OK. New setting will be displayed on desktop.
Note: If you are in some other country like Japan or Australia where the time zone is different, it can be set using the Change time zone button [(Fig. 6.47 (a)].

CREATION/CUSTOMIZATION OF FILES AND FOLDERS
Files and Folders: Windows allows us to store our data in the form of files which are locations in memory that can be given a name and can be identified by the name. These files can exist independently or can be put together in a folder. A folder can contain many other folders also.

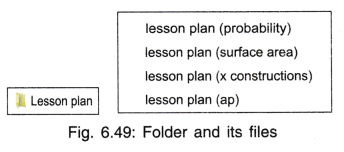
Naming Files/Folders: A file name has two parts — name and extension. The extension is a three character name added by the system according to the type of file. For example, a text file is given an extension .txt, so the file name may look like biodata.txt.

Locating and Opening A File/Folder
A file/folder on any of the drives can be opened by any of the following methods:
Method (1) Using Computer
- Click on Computer icon.
- All drives will be displayed.
- Choose the drive on which your folder/file is present.
- All folders/files of the selected drive will be displayed on screen.


- Double click on the one you want to choose or right click mouse button and choose Open.
Method (2) Using Start Button
- Click on Start.
- Type the file to be searched in search box (Fig. 6.53).

Copy Files/Folders
To copy a file/folder from one place to another, you can adopt any of the following methods:
Method (1) Copy and Paste
- Select the file/folder you want to copy.
- Right click and select Copy.
- Right click on drive or folder you want to copy to.
- Select Paste.
Method (2) Drag and Drop
- Select the file/folder to be copied.
- Keep the Ctrl key pressed and drag the selected folder to its destination folder and drop.
The shortcut keys for Cut, Copy and Paste are given in Fig. 6.54.

Selecting Multiple Files
- Selecting All files in the folder —> Ctrl + A.
- Selecting some of the files which are next to each other in a folder —> Shift + Arrow keys.
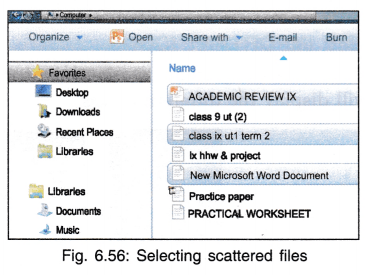
- Scattered files in a folder —> Ctrl + left mouse button on the files one by one.

Move Folders
To move a file/folder from one place to another, any of the following methods can be adopted:
Method (1) Cut and Paste
- Select folder to be moved.
- Right click and select Cut.
- Right click on folder where you want to move and select Paste.
Method (2) Drag and Drop
- Repeat the same steps as in case of copying the folder but instead of Ctrl key press shift key.
Rename a File
A file can be renamed by any of the following methods:
Method (1)
- Select a file/folder.
- Right click and from shortcut menu choose Rename.
- Enter the New name.
Method (2)
- Select the file/folder.
- Press F2 button to highlight the name.
- Type new name.
Deleting a File
A file can be deleted by any of the following methods:
Method (1)
- Select the file/folder to be deleted.
- Right click and choose Delete.
Method (2)
- Drag the selected file/folder to Recycle Bin and drop it.
Method (3)
- Select the file and Press Del key.
SOME IMPORTANT ICONS
- Computer: It basically tells you what is stored in your computer. A double click on this icon will display the different drives.

Double click on any drive and it will display all files and folders stored on the drive. - Recycle Bin: On the desktop there is an icon similar to a waste paper basket. This icon represents Recycle Bin. Any file/folder deleted by us gets stored in Recycle Bin. This file/folder can be restored to its original location on computer’s memory again or can be permanently deleted. Emptying the Recycle Bin deletes all files stored in it.

- Internet Explorer: This enables us to access WWW (World Wide Web) when we are connected to Internet so that we can retrieve information on any topic. It also allows us to send e-mail or chat with other computers on Internet. Google chrome and Mozilla Firefox are also very popular web browsers.

CONTROL OPTIONS OF WINDOWS
While using windows platform, for every application a window is opened. A file is also opened in a window. Every window has the control buttons on upper right corner which can be used to maximize, minimize, restore or close the window.
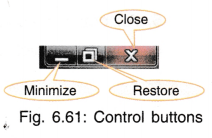

Similar options are available on the left side upper corner of the window. When you click on the application icon a pull-down menu appears containing:
- Restore: Brings the window back to its original size.
- Minimize: Reduces the window as an icon on task bar. Clicking on this icon again displays the window.
- Maximize: Gives the full screen view of the window.
- Close: Closes the present active window.